

Metal Strapping +Fasteners Kit- 10/20/30/50 PCS
Use code Blog for 15% off your order.
- CUT TO FIT: Trim the band to create the exact clamp size you need.
- 304 STAINLESS STEEL: Rust- and corrosion-resistant for reliable indoor and outdoor use.
- ADJUSTABLE & REUSABLE: Easily tighten, loosen, and readjust with a screwdriver or 8 mm socket.
$37.99 USD
 Metal Strapping +Fasteners Kit- 10/20/30/50 PCS
From $23.99 USD
Choose options

How to Use a DIY Hose Clamp Kit: Cut, Thread, and Finish the Band
OURU ASSEMBLY GUIDE · QUICK ANSWER
Measure first. Anchor one end. Adjust the other.
To use a DIY hose clamp kit, measure the installed connection, establish the required band allowance, cut and deburr the strip, attach its fixed end to the fastener, then feed the opposite end through the screw mechanism. Position and tighten the assembly according to the connection’s requirements.
01 · Plan the lengthInstalled circumference and fastener allowance are separate measurements.
02 · Identify both endsThe fixed end anchors the housing; the free tail moves through the screw.
03 · Check before serviceAssembly alone does not establish application suitability or acceptance.
View the OURU cut-to-length band and matching fasteners

This guide explains how to use a DIY hose clamp kit with Ouru’s slotted band and separate worm-drive fasteners. It is not an installation method for every band-and-buckle system. A custom circumference does not establish suitability for a particular hose, fluid, temperature, or pressure. Application selection guidance: NORMA.
Before You Cut: Isolate the Connection and Check the Parts
Stop the equipment, isolate its energy and fluid supplies, release residual pressure using the applicable service procedure, and allow hot components to cool. Verify the safe condition before touching the joint. Do not loosen a pressurized connection or assume that switching off a pump removes trapped pressure. CCOHS: lockout guidance.
Wear eye protection and cut-resistant gloves when handling banding. Select snips explicitly rated for its material and thickness; a tool’s rating for mild steel does not automatically establish its stainless-steel capacity. Do not use household scissors or extend the handles for more leverage. CCOHS: snips.
Use this worksheet to prevent an irreversible cut before the installation details are settled:
| Check | Record before cutting |
|---|---|
| Connection | Installed outside circumference and intended band position |
| Band and housing | Kit identification and confirmation that they belong together |
| Assembly allowance | Required fixed-end fold, overlap, and screw engagement |
| Tools | Cutter capacity and correct driver fit |
| Final installation | Application approval, tightening requirement, and inspection method |
These are preparation checks, not a pressure rating or a completed-joint acceptance test.
MATCH THE PARTS BEFORE YOU CUT
OURU metal strapping + fasteners kit
For users assembling a custom-size clamp from slotted band and separate matching worm-drive fasteners. Compare your pack and hardware with the product details before starting. You will also need a measuring tape, marker, suitable hand file, pliers for the specified band fold, and a correctly fitting driver.
Check Your Kit and Fastener Details →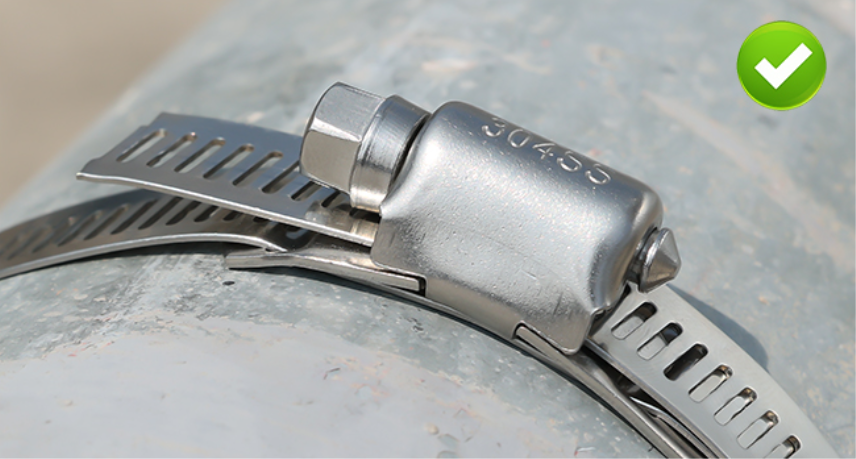
Step 1: Measure the Installed Hose, Then Determine the Cut Length
Measure around the hose where the clamp will sit, with the hose already seated on its fitting. Do not use the hose’s nominal inside diameter or measure only the bare fitting. Clampco’s sizing instructions specifically use the assembled hose-and-fitting outside dimensions. Clampco: proper sizing.
For a round assembly, circumference can be estimated from outside diameter:
Circumference = π × installed outside diameter
A 100 mm outside diameter gives a circumference of approximately 314 mm. That is a geometry example—not an instruction to cut a 314 mm band.
Direct circumference measurement is also useful when calipers cannot reach. The cut length must additionally account for the actual fastener arrangement, including its anchor fold and working engagement. Do not add an arbitrary inch or copy an allowance from another brand. Ouru’s public FAQ requires adequate overlap but does not specify a numerical allowance. Obtain that requirement for your fastener before cutting.
As a planning aid, label the connection measurement and fastener allowance separately on your worksheet. This makes it easier to identify whether a later problem came from measurement or assembly, instead of treating every short band as a tightening problem.
For broader sizing terminology, see Ouru’s hose clamp measurement guide.

Step 2: Cut Hose Clamp Banding on a Stable Work Surface
Work with the loose strip away from the hose, fitting, wiring, and finished surfaces. Support the material so it cannot shift, keep fingers clear of the cutting path, and control the offcut. CCOHS recommends stabilizing stock and making straight cuts with a tool suited to the material. CCOHS: cutting tools.
Cut across the band at the confirmed mark. Do not twist the snips sideways or force them through material beyond their capacity. If the strip buckles or the cutter stalls, stop and reassess the tool rather than adding a hammer or longer handle.
For learning how to cut hose clamp banding, the useful result is a controlled cut that preserves the usable strip—not simply separating it quickly. Avoid repeatedly bending the band back and forth to snap it off as a substitute for the specified cutting method. Collect the offcut immediately. Do not leave small sharp pieces beside the hose or where someone will place a hand.
Step 3: Deburr the Cut Edge Without Changing the Working Slots
Remove cutting burrs and sharp end corners with a suitable hand file before threading the band. Inspect the end under good lighting rather than running an unprotected finger along it. Keep metal filings away from the hose opening and equipment.
The purpose is edge cleanup, not reshaping the strip to fit an incompatible housing. Do not enlarge its slots, narrow its sides, or remove material from the screw-engagement area. A visibly torn, cracked, or badly distorted working section should not be forced through the fastener. Any later trimming creates another cut edge that also needs attention. Remove load from the band and work away from the hose before making another cut.
Step 4: Attach the Fixed End to the Ouru Fastener
To understand how to assemble a hose clamp from a roll, distinguish the fixed end, which anchors the housing, from the free end, which will feed through the screw.
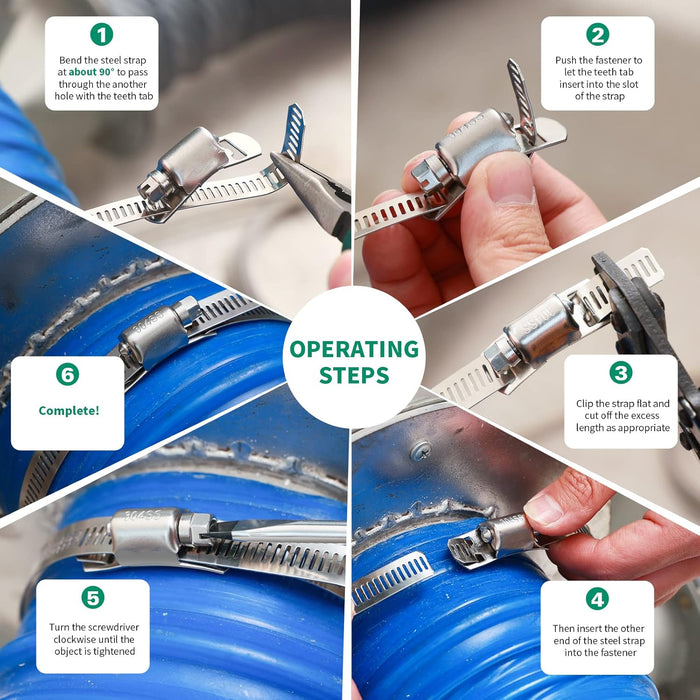
For the fastener shown in Ouru’s instructions, start through the opening without the toothed tab. The illustrated sequence then bends the strap end approximately 90 degrees, passes it through the other opening, and seats the tab in a band slot. Flatten the returned strap end as pictured, preserving the required anchor length.
Bend the band as instructed. Do not bend the housing or tab.
Stop if the components cannot match the documented arrangement without forcing the fastener. If your housing differs, obtain instructions for that version rather than adapting the pictured sequence.
Step 5: Form the Loop and Engage the Moving Tail
Wrap the prepared band around the intended connection without twisting it. Feed the opposite end into the screw mechanism as shown in the assembly diagram. The free tail and the anchored return are different parts of the connection; do not confuse their paths.
Use a driver that matches the screw head and keep it aligned. CCOHS advises matching both screwdriver type and size, rather than forcing an unsuitable tip into the head. CCOHS: screwdrivers.
Using the hand driver, turn the screw clockwise as pictured, watching whether it advances the band. If it spins without movement, stop and inspect the feeding direction, engagement, and component condition. Do not compensate with extra force or a power driver. A stripped screw or damaged band needs attention before installation continues.
Step 6: Position and Tighten for the Actual Application
Place the band over the connection’s specified clamping area and check that it is square rather than tilted. The sealing location belongs to the hose-and-fitting design; do not copy a universal distance from the hose edge. See Ouru’s installation mistakes guide.
Follow the applicable installation torque and method. There is no single screwdriver turn count for every cut-to-length hose clamp installation. NORMA emphasizes that correct clamp selection includes materials, temperature, environment, and appropriate tightening—not simply greater force.
If a torque figure is supplied, confirm that it is the recommended installation value for this assembly, not a destructive test result or a limit for another clamp. Ideal Tridon separates installation torque from destructive torque. Those values are not Ouru specifications.
If the required tightening information is unavailable, request it before putting the connection into service. This guide does not establish approval for fuel, brake, gas, or high-pressure hydraulic repairs.
Step 7: Protect the Tail and Check the Finished Connection
Keep the necessary screw engagement and adjustment length. Do not cut the tail flush with the housing merely for appearance. Where an exposed edge could contact people or nearby components, Ouru recommends a suitable fitted tail cover rather than relying on ordinary tape or a sharp fold.
Check the entire assembly for twisted banding, damaged slots, housing distortion, hose cuts, and contact with nearby wiring or moving parts. A connection that looks tight still needs the inspection and testing required by its equipment or hose manufacturer.
Restore service only through that procedure. Do not invent a pressure test or repeatedly tighten a persistent leak. Clamp temperature and pressure suitability are product-specific, as Ideal Tridon’s guidance also makes clear.
If Assembly Does Not Go as Planned
The checks below are troubleshooting prompts, not confirmed diagnoses:
| Observation | Check before continuing |
|---|---|
| Cut end catches at the opening | Burrs, distortion, and whether the band matches the housing |
| Fixed end comes free | Starting opening, tab engagement, and anchor arrangement |
| Screw turns but the loop does not shorten | Tail path, adequate engagement, and damaged slots or threads |
| Band will not reach | Installed measurement and required fastener allowance |
| Hose deforms or the joint still leaks | Application suitability, position, hose, fitting, and tightening requirement |
Stop rather than modifying a housing, patching together short strips, or treating additional torque as the universal repair. For connection-level problems, continue with Ouru’s hose clamp troubleshooting guide.
Frequently Asked Questions
Is the hose circumference the correct cut length?
No. The fastener needs its specified fixed-end fold, overlap, and working engagement in addition to the installed connection measurement. Confirm the allowance for your actual fastener before cutting.
Which opening should the fixed end enter first?
For the Ouru fastener pictured here, start through the opening without the toothed tab. Follow the official diagram for the remaining band fold and tab engagement.
Can I bend the fastener to make the strip fit?
No. The documented fold is in the band. Do not force or reshape the housing or its tab.
How much torque should I apply?
Use the installation requirement applicable to the actual kit and hose-and-fitting assembly. This guide does not provide a universal torque or turn count.
YOUR NEXT STEP
Confirm the parts. Confirm the allowance. Then cut.
Need a matching kit or replacement fasteners? Compare the band-and-fastener options and verify compatibility before ordering.
View OURU Kit & Fastener Options →Get Assembly Help Before Cutting Another Strip
Use Ouru’s support form with your order reference, pack identification, installed measurement, and photos of both sides of the fastener. State whether the difficulty is anchoring, feeding, tightening, or protecting the tail.
Ask for the required cut allowance, anchor length, working engagement, and installation requirements for your application. That information is more useful than buying another kit or cutting repeated trial pieces.
Confirm Your Assembly Requirements →Related Guides
Metal Strapping +Fasteners Kit- 10/20/30/50 PCS
Use code Blog for 15% off your order.
- CUT TO FIT: Trim the band to create the exact clamp size you need.
- 304 STAINLESS STEEL: Rust- and corrosion-resistant for reliable indoor and outdoor use.
- ADJUSTABLE & REUSABLE: Easily tighten, loosen, and readjust with a screwdriver or 8 mm socket.
$37.99 USD
Leave a comment