
Certified Business
With over 10,000 orders
With over 10,000 orders
Loosening a hose clamp is a common task in automotive repairs and home plumbing fixes. Whether you’re an automotive technician working on coolant hose clamps or a homeowner replacing a dishwasher hose, the goal is the same – remove or adjust the clamp without damaging the hose or fitting. Hose clamps (often stainless steel hose clamps in automotive and marine applications) come in many sizes and styles. You might encounter tiny mini hose clamps under 1 inch for fuel lines, standard 1–2 inch stainless hose clamps on radiator or coolant hoses, or even heavy-duty 4–6 inch clamps on large pipes. (There are even massive 8, 10, or 12 inch hose clamps for industrial use!) Regardless of size – be it a small #6 hose clamp, a medium 2 inch hose clamp, or a large 8 inch hose clamp – the basic process to loosen it is similar. In this friendly how-to, we’ll cover everything you need to know, from safety preparations to the specific tools and techniques for different clamp types. By the end, you’ll be able to loosen hose clamps (stainless steel or otherwise) like a pro, all while protecting your equipment.
(Pro Tip: If you need replacement clamps during your project, having an assortment of quality stainless clamps handy, such as the Ouru 304 stainless hose clamps kit, will make your life easier.)

Before grabbing your screwdriver or pliers, take a moment to ensure the job can be done safely. Start by powering down any equipment and relieving pressure in the system that the hose is part of. For example, if you’re working on a vehicle’s cooling system, make sure the engine is off and cool, and open the radiator cap or reservoir (if safe) to relieve pressure. In plumbing, shut off the water supply and drain any water from the hose. Depressurizing or draining fluids prevents accidental sprays when the clamp is loosened. Next, wear proper safety gear: put on safety glasses to shield your eyes from any spurting fluid or flying debris, and wear gloves for a better grip and to protect your hands. Ensure your work area is clear and well-lit. You’ll also want to have some rags handy to catch any drips, and a small container for loose hardware. Finally, plan for replacement – if the clamp is old or rusty, you might end up damaging it during removal (or decide to cut it off for ease). It’s wise to have a new stainless clamp of the appropriate size ready.
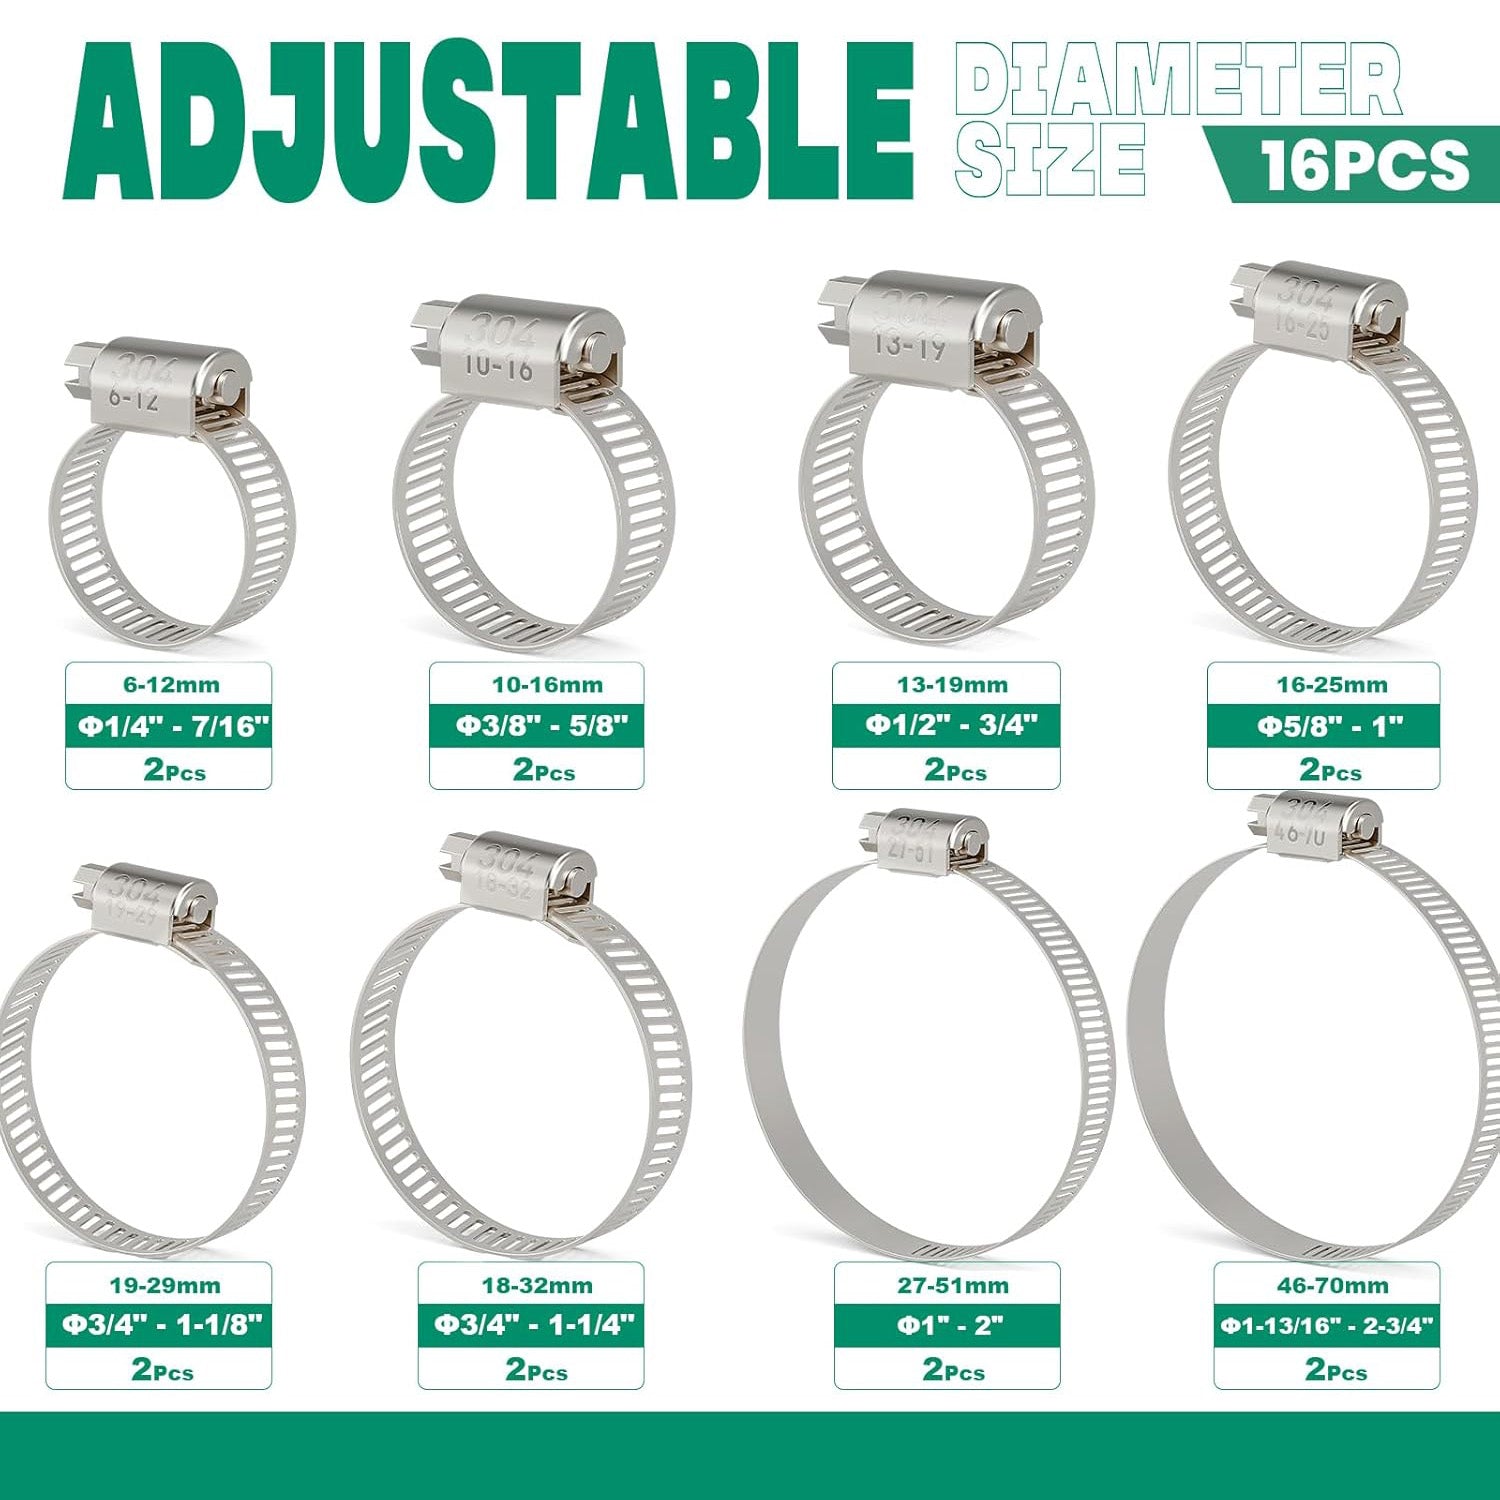
For instance, Ouru’s Stainless Steel Hose Clamp Kit comes with a range of common sizes in durable 304 stainless steel, so you can quickly swap in a new clamp if needed, ensuring a leak-proof reassembly.

Not all hose clamps loosen the same way – it largely depends on their type. Take a close look at the clamp you’re dealing with to identify its style. The most common type is the worm gear clamp (also known as a worm-drive clamp or screw clamp). This has a slotted or hex head screw and a band with threaded perforations. If you see a screw head on the band, you’ve got a worm gear clamp, typically made of galvanized or stainless steel. These are used everywhere from car engines to garden hoses because they’re strong and adjustable. Another common style, especially in cars, is the spring hose clamp. Spring clamps are usually a circle of spring steel with two protruding tabs or “ears.” If your clamp has two tabs that you can squeeze together, it’s a spring-type clamp. You’ll often find spring clamps on factory-installed automotive hoses (like coolant hoses) because they maintain constant tension through temperature changes. A third type is the ear clamp (also called O-clamp or crimp clamp). These are ring-shaped clamps, often stainless, with one or two “ears” that have been pinched to tighten them. Ear clamps (e.g. Oetiker style) are single-use – they’re crimped in place and do not unscrew, so removal means cutting them off. If you see a smooth band without a screw, but with a crimped section, that’s an ear clamp. Lastly, there are heavy-duty bolt clamps (T-bolt or barrel clamps). These have a band with a bolt and nut assembly instead of a simple screw. They’re common on high-pressure or large diameter applications (like turbocharger pipes or marine hoses). Identify a bolt clamp by the prominent hex nut on it. You might also encounter less common plastic snap-fit clamps or other specialized clamps, but the four types above are the main ones for hoses.
Knowing the clamp type is important because it tells you which tool and method to use. For example, you’ll loosen a worm gear hose clamp by turning its screw, but a spring clamp needs to be compressed with pliers, and an ear clamp must be snipped off.
Identifying the type also helps you choose a proper replacement clamp if needed – our Ouru assortment kit includes multiple worm gear stainless steel hose clamps (the most prevalent type) to fit various hose sizes, so you’re covered no matter which clamp you encounter.

Using the right tool for the clamp makes the job much easier and prevents damage. Here’s a quick checklist of tools and supplies you may need for different clamp types:
Screwdrivers or Nut Drivers: For worm gear (screw-type) clamps, use a screwdriver that fits the screw head snugly. Most worm clamps have a slotted flat-head screw, while some have a Phillips or even a small hex head. A 1/4” nut driver or small socket wrench can also work if the clamp has a hex screw head. Using the correct size tool is key – a poor fit can strip the screw head, making removal difficult. It’s good practice to have a couple of driver sizes on hand.
Pliers (Regular or Specialty): For spring hose clamps, a pair of pliers is required. Standard slip-joint or tongue-and-groove pliers can work in a pinch to squeeze the clamp tabs, but a dedicated hose clamp plier (often with locking ratchet mechanism or cable extension) is even better. These allow you to compress spring clamps evenly without slipping, and some can lock in place to free your hands. Locking pliers (Vise-Grips) can also be used to hold a spring clamp open if you don’t have the special tool.
Clamp Cutters or Pinch Pliers: For ear clamps or any clamp you plan to remove permanently, you’ll need a cutting tool. Side cutters (diagonal pliers) or end-cutting pincers are commonly used to snip through ear clamps. A specialized pinch clamp cutter or crimping tool (which looks like a blunt plier) is ideal for ear clamps – it can both crimp new ones and cut off old ones. Tin snips or even a small Dremel cutting wheel can be used carefully for stubborn metal clamps as well. Always cut away from the hose to avoid nicking it – more on that in the tricks section.
Socket Wrench: For bolt-style heavy-duty clamps (T-bolt clamps), use a socket or wrench that fits the clamp’s nut (commonly 7 or 8mm, or 5/16”). A small ratchet or nut driver gives you the needed torque to loosen the bolt. A flat screwdriver can sometimes turn the bolt as well, but a socket is less likely to slip.
Supporting Tools: It’s wise to have a flathead screwdriver (prying tool) on hand even for spring or bolt clamps, not for the screw, but to gently pry the clamp band if it’s stuck to the hose. Over time, hoses can bond to the clamp due to heat or debris. Gently sliding a flat screwdriver under the band after it’s loosened can break that bond. Also consider having a small piece of thin sheet metal or shim. Here’s a pro trick: before cutting a stubborn clamp, slip a thin metal strip or even an old credit card between the clamp and hose as a shield. This protects the hose rubber while you work a screwdriver or cutter to get the clamp off. Penetrating oil (like WD-40) is another handy item – a quick squirt on a rusty screw can help it turn more freely (just wipe the hose clean after). Lastly, if the hose itself is stuck on the fitting even after the clamp is loose, a hose removal tool or a simple pair of pliers can help twist or pull the hose (more on that later).
Illustration: The common tools to loosen a worm-drive stainless hose clamp include a flat-blade screwdriver, a 1/4″ socket driver, or a small wrench. Using a well-fitting driver on the clamp’s screw head prevents slipping or stripping.

Having these tools ready will make clamp removal smooth. Place them within reach before you start, so you’re not scrambling mid-job. And remember, if you’re replacing old clamps, use quality new ones. An all-304 stainless steel hose clamp (like those in Ouru’s kit) won’t rust or strip as easily as cheap clamps, ensuring your reassembly is secure.
Now for the fun part – actually loosening the clamp. The technique will vary slightly based on the clamp type you identified, so let’s go through the common ones one by one:
1. Worm Gear Clamps (Screw Clamps): This is the classic adjustable hose clamp with a screw mechanism. To loosen a worm gear clamp, insert your screwdriver or nut driver into the screw head and turn counter-clockwise (anti-clockwise). It will take several turns for the band to start expanding. Keep turning until the clamp’s band is loose enough that you can slide the clamp back off the hose or at least relieve pressure on the hose. If the screw is very tight or corroded, apply steady pressure – avoid angling the screwdriver which can cam-out and strip the screw. If the screw head strips or refuses to turn, you have a few options: try a slightly larger flat screwdriver bit (to get more bite) or even grip the screw head with needle-nose pliers and turn that way. In a worst-case scenario where the screw is totally frozen, you may need to carefully cut the clamp (protect the hose as mentioned). Once the screw is loosened sufficiently, the clamp will practically fall off the hose. Slide it off and set it aside. No-damage tip: If the clamp has been on for a long time, it might stick to the hose. Gently work a flat screwdriver under the band to free it, taking care not to gouge into the hose.
2. Spring Clamps (Spring-Band Clamps): To loosen a spring clamp, you don’t “turn” anything – instead, squeeze the tabs. Use your hose clamp pliers or regular pliers to grasp both tabs of the spring clamp and compress them together. This action counteracts the spring tension and expands the clamp’s diameter. Squeeze firmly and the clamp will open up; while holding it squeezed, you can now slide the clamp back off the hose or move it further down the hose away from the connection. Spring clamps often snap closed as soon as you release tension, so keep a good grip (or use locking pliers that can latch while compressed). Be cautious here: the clamp is under spring force and can fly off or snap back quickly if you lose grip. It’s a good practice to maintain a controlled hold and slowly release the clamp once it’s in the desired position (for example, once it’s past the hose barb or off the hose). If the clamp is in a tight spot (common in engine bays), specialized cable-operated spring clamp pliers are extremely helpful – they let you compress the clamp from a distance. After the spring clamp is moved off the fitting, the hose should be free from that clamping force. No-damage tip: When reusing spring clamps, inspect them for any deformation or loss of springiness. Generally, spring clamps are robust and reusable, but if one looks warped or rusted, it’s wise to replace it with a new stainless clamp for peace of mind.
3. Ear Clamps (Single-Use Crimp Clamps): An ear clamp cannot be “loosened” in the traditional sense, because it’s crimped tight and has no screw mechanism. If you need to remove an ear clamp, the approach is to cut it off carefully. Use a quality pair of side cutters or pincers to snip through the crimped “ear” of the clamp. Sometimes you might have to cut both ears (if double-eared) or make two cuts to fully release the band. When you cut the ear, the clamp’s tension will release and you can peel the clamp off the hose. Take care not to cut into the hose itself – aim your cutter at the raised ear section, and consider placing a thin metal sheet or even the blade of a flat screwdriver between the clamp and hose as a shield. Once the ear clamp is off, it’s destroyed (as intended). If you need to put things back together, you’ll have to use a new clamp – either crimp on a new ear clamp using the proper tool or replace it with a worm drive clamp of the right size. Many mechanics opt to replace crimped clamps with adjustable worm gear clamps for convenience during future maintenance. No-damage tip: When cutting an ear clamp, wear eye protection (the cut piece can sometimes shoot out) and use sharp cutters – dull ones may slip.
4. T-Bolt or Heavy-Duty Clamps: These beefy clamps use a bolt and nut to tighten, and they’re often stainless steel heavy-duty hose clamps used in high-pressure applications. To loosen one, use a wrench or socket on the nut and turn counter-clockwise, similar to a regular bolt. Keep turning until the nut is sufficiently backed off that the clamp’s loop expands. In many T-bolt clamps, the bolt will come completely free of the band when loose enough, effectively opening the clamp. At that point you can pull the clamp away. Be mindful that a long-used heavy clamp might “stick” to the hose due to imprint. If it doesn’t slide off once fully loose, gently pry under it as you would with a worm clamp. T-bolt clamps are usually reusable, so if it’s in good shape you can use it again during reassembly. Just inspect the threads of the bolt and the band for any damage or heavy corrosion. If any is found, replacement is recommended.
5. Other Quick-Release or Snap Clamps: Occasionally you might find snap-fit plastic clamps or other quick-release designs (for example, some vacuum line clamps or appliance hose clamps). The removal for these will depend on their design – some plastic ratchet clamps have a little tab you pry up to release the lock. Others might have a small latch to depress. In general, if you encounter an unfamiliar clamp, don’t force it; look for a locking mechanism or consult the product info. These are less common, so we won’t delve deep, but the key is usually a gentle prying at the right spot to unlock the clamp.
Now that the clamp is loosened or removed, you may face one more challenge: getting the hose off the barb or pipe. Often hoses become stuck even after the clamp is gone – due to heat, age, or adhesive grime forming a seal. The best trick here is to twist the hose to break that seal. Grip the hose (with pliers or by hand with gloves) and rotate it on the fitting to free it up, then pull it off. Avoid using excessive brute force or sharp tools that could tear the hose. If a hose is really stubborn, a little penetrating oil around the fitting edge or warming the hose with a hair dryer can help, but usually a firm twist does the job. With the hose removed, you’ve succeeded in loosening the clamp and hose without damage!
(By now, if any of your clamps were damaged or rusted, you should replace them. This is where having a kit of new stainless steel clamps comes in handy – you can select the right size from the kit and install it during reassembly. For example, swapping in a fresh clamp from the Ouru assortment ensures a reliable seal and prevents future leaks.)

Learning how to loosen a hose clamp properly is a valuable skill for any DIYer or professional mechanic. By following the steps outlined – from careful prep and safety measures to using the correct tools for each clamp type – you can avoid common pitfalls like stripped screws, snapped clamps, or damaged hoses. Remember to always prioritize safety (depressurize systems and wear eye protection) and to identify what kind of clamp you’re dealing with before you begin. A little extra time spent identifying a worm gear, spring, or ear clamp will save you frustration and prevent damage. Use steady, controlled force when loosening clamps and take advantage of the no-damage tricks: for instance, shielding the hose with a piece of metal when prying or cutting a clamp, and twisting hoses to break them free instead of prying on them. As a final tip, whenever you reinstall or replace a clamp, opt for quality hardware – stainless steel hose clamps are corrosion-resistant and strong, ideal for automotive, marine, or home use. Keep a selection of common sizes on hand (having an assortment like the Ouru kit means you’ll always have the right size clamp ready for the job). Whether you’re an automotive technician dealing with radiator lines or a homeowner fixing a leaky washing machine hose, these techniques will help you loosen any hose clamp safely and effectively – with zero damage to your hoses or equipment. Happy wrenching!
References:
{"one"=>"Select 2 or 3 items to compare", "other"=>"{{ count }} of 3 items selected"}
Leave a comment